Working with Different Javascript applications with Docker and NGINX

In web development, you might often find a scenario where you need to work with different Javascript applications together, whether backend frontend services or all frontend services. If you are running backend and frontend service then you can run two different docker containers for each and communicate with any communication protocols like HTTP with Rest, graphQl or tRPC. We have a unique scenario where we have two or more frontend services for some reason, and they have to be working under the same URL for sharing some local state. Let's try to understand the situation with a diagram here.
Problem Statement
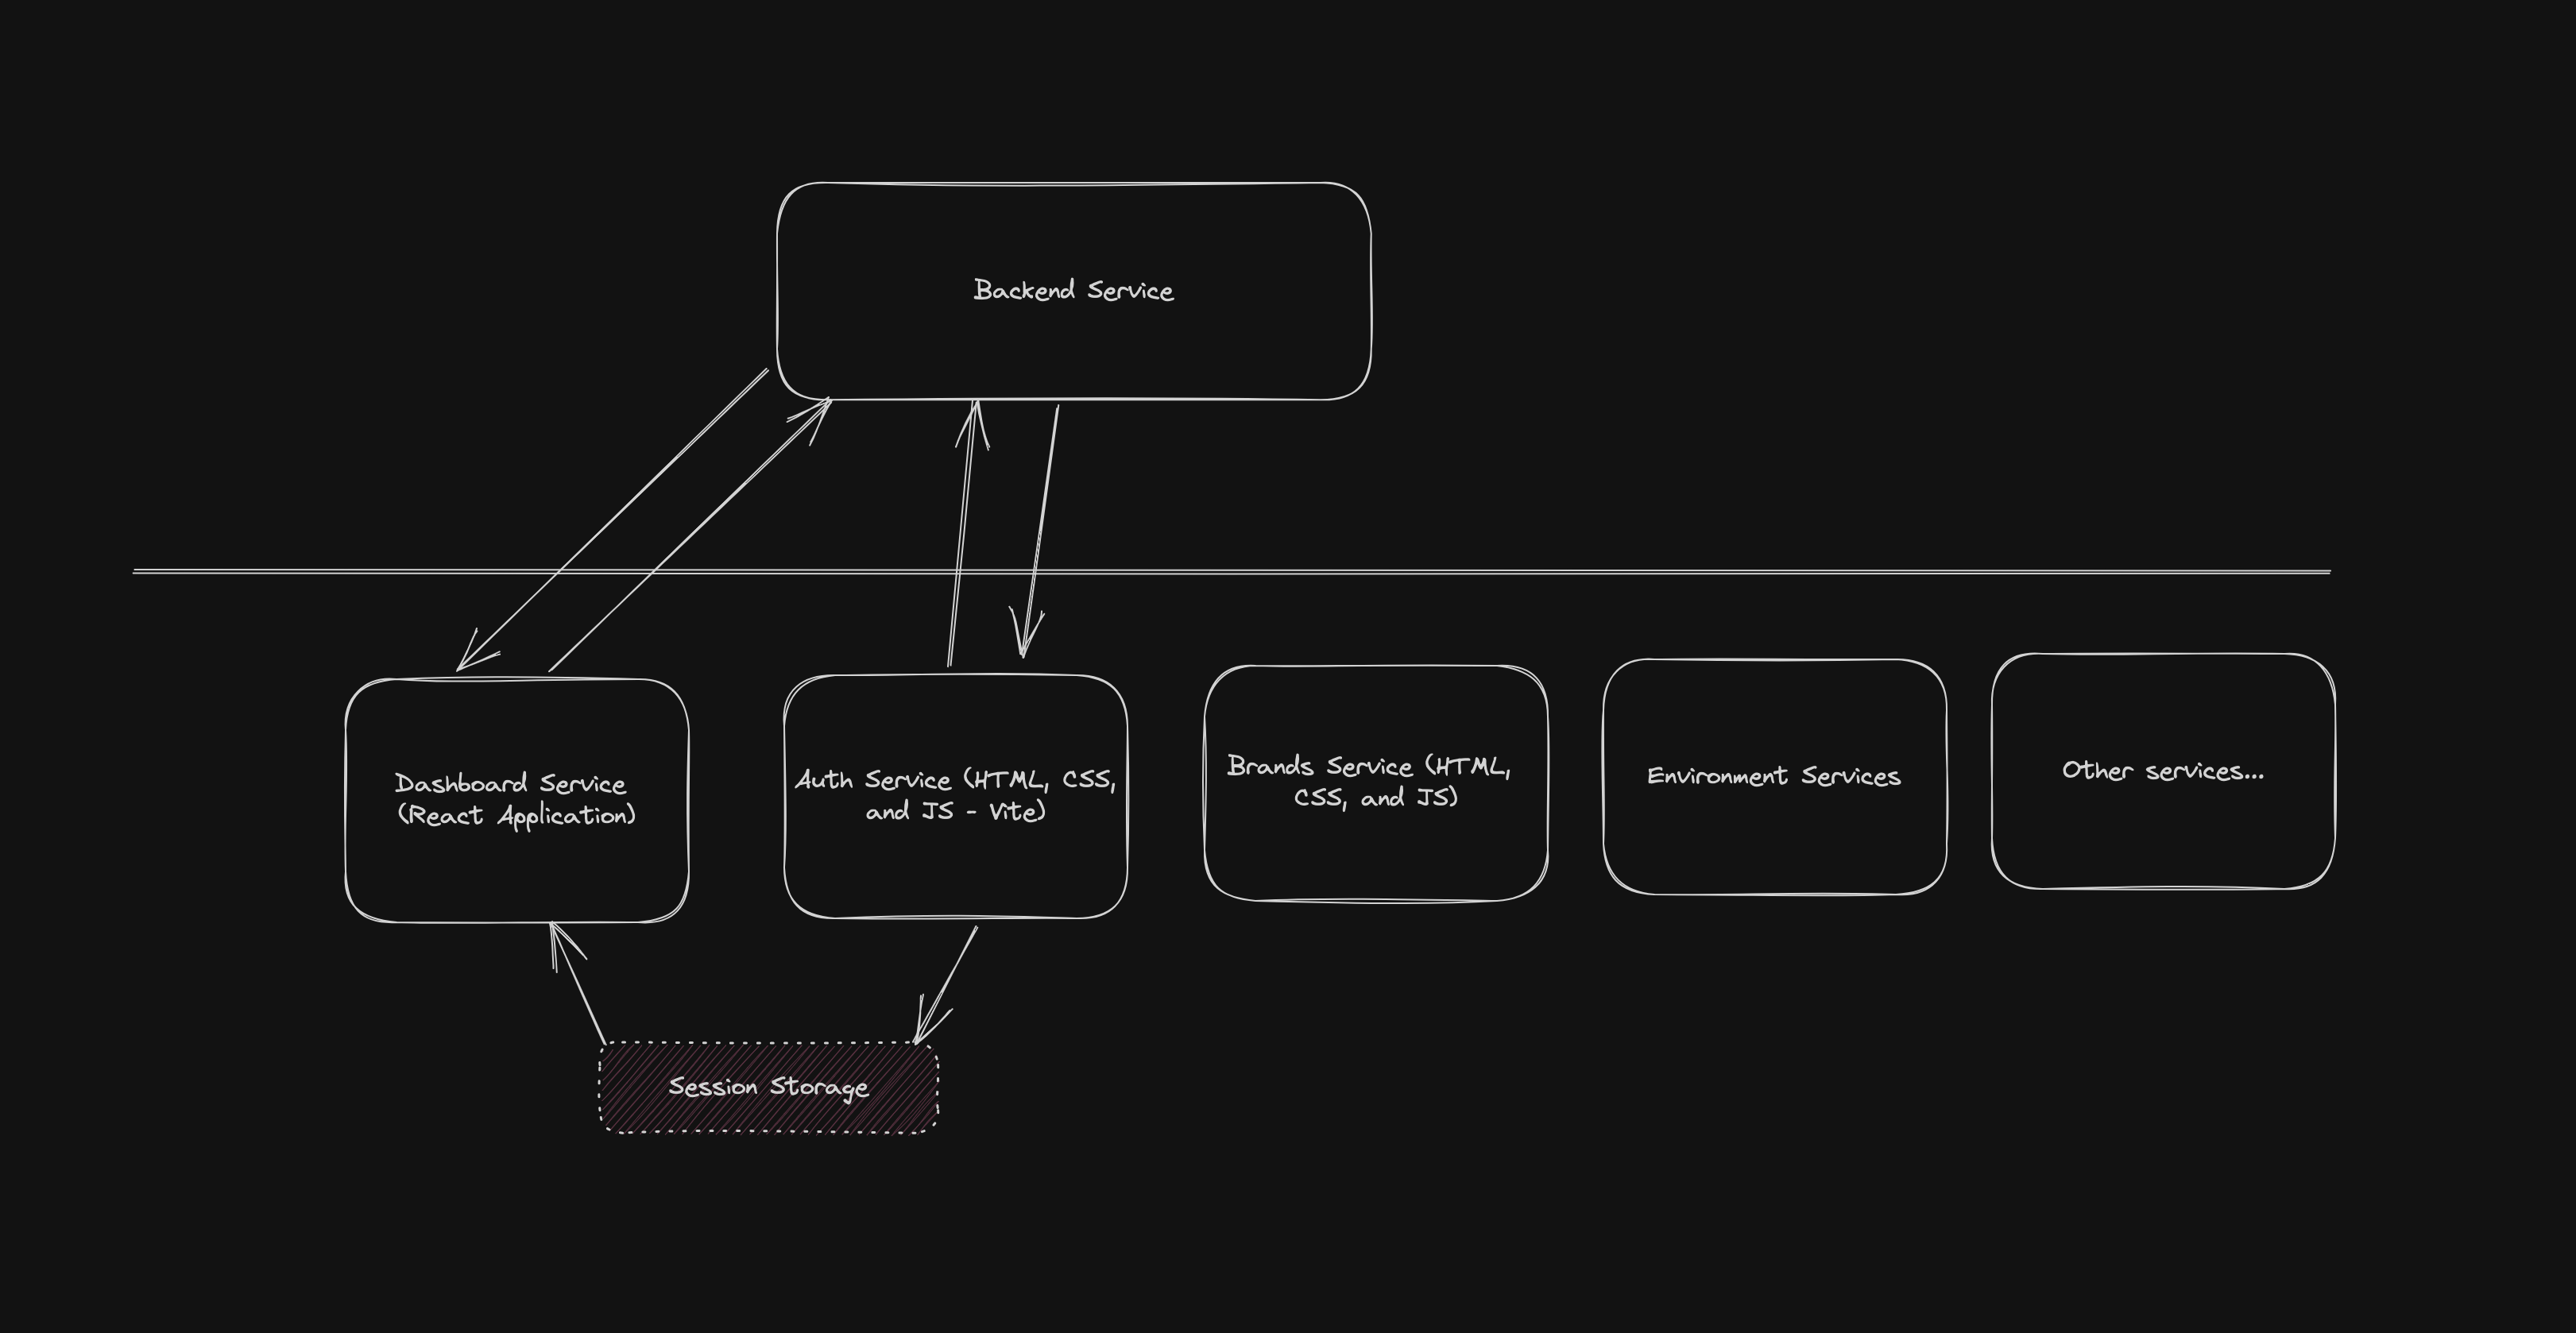
Here, Architecture is simple. There are a bunch of frontend services and one backend service. Let's look into two services of our concern here, Auth service and Dashboard service.
Auth Service is built with HTML, CSS and plain Javascript with vite as the bundler and the Dashboard service is built with the ReactJs. Please don't ask why we are building the Auth service separately and not inside the ReactJs application. Our concern here is to build both services together so that we can share some common state like authentication token and other session variables with session storage. As we know for sharing session storage both of the applications should run under the same port otherwise the session stored by the Auth service couldn't be received by the Dashboard service.
Introducing NGINX
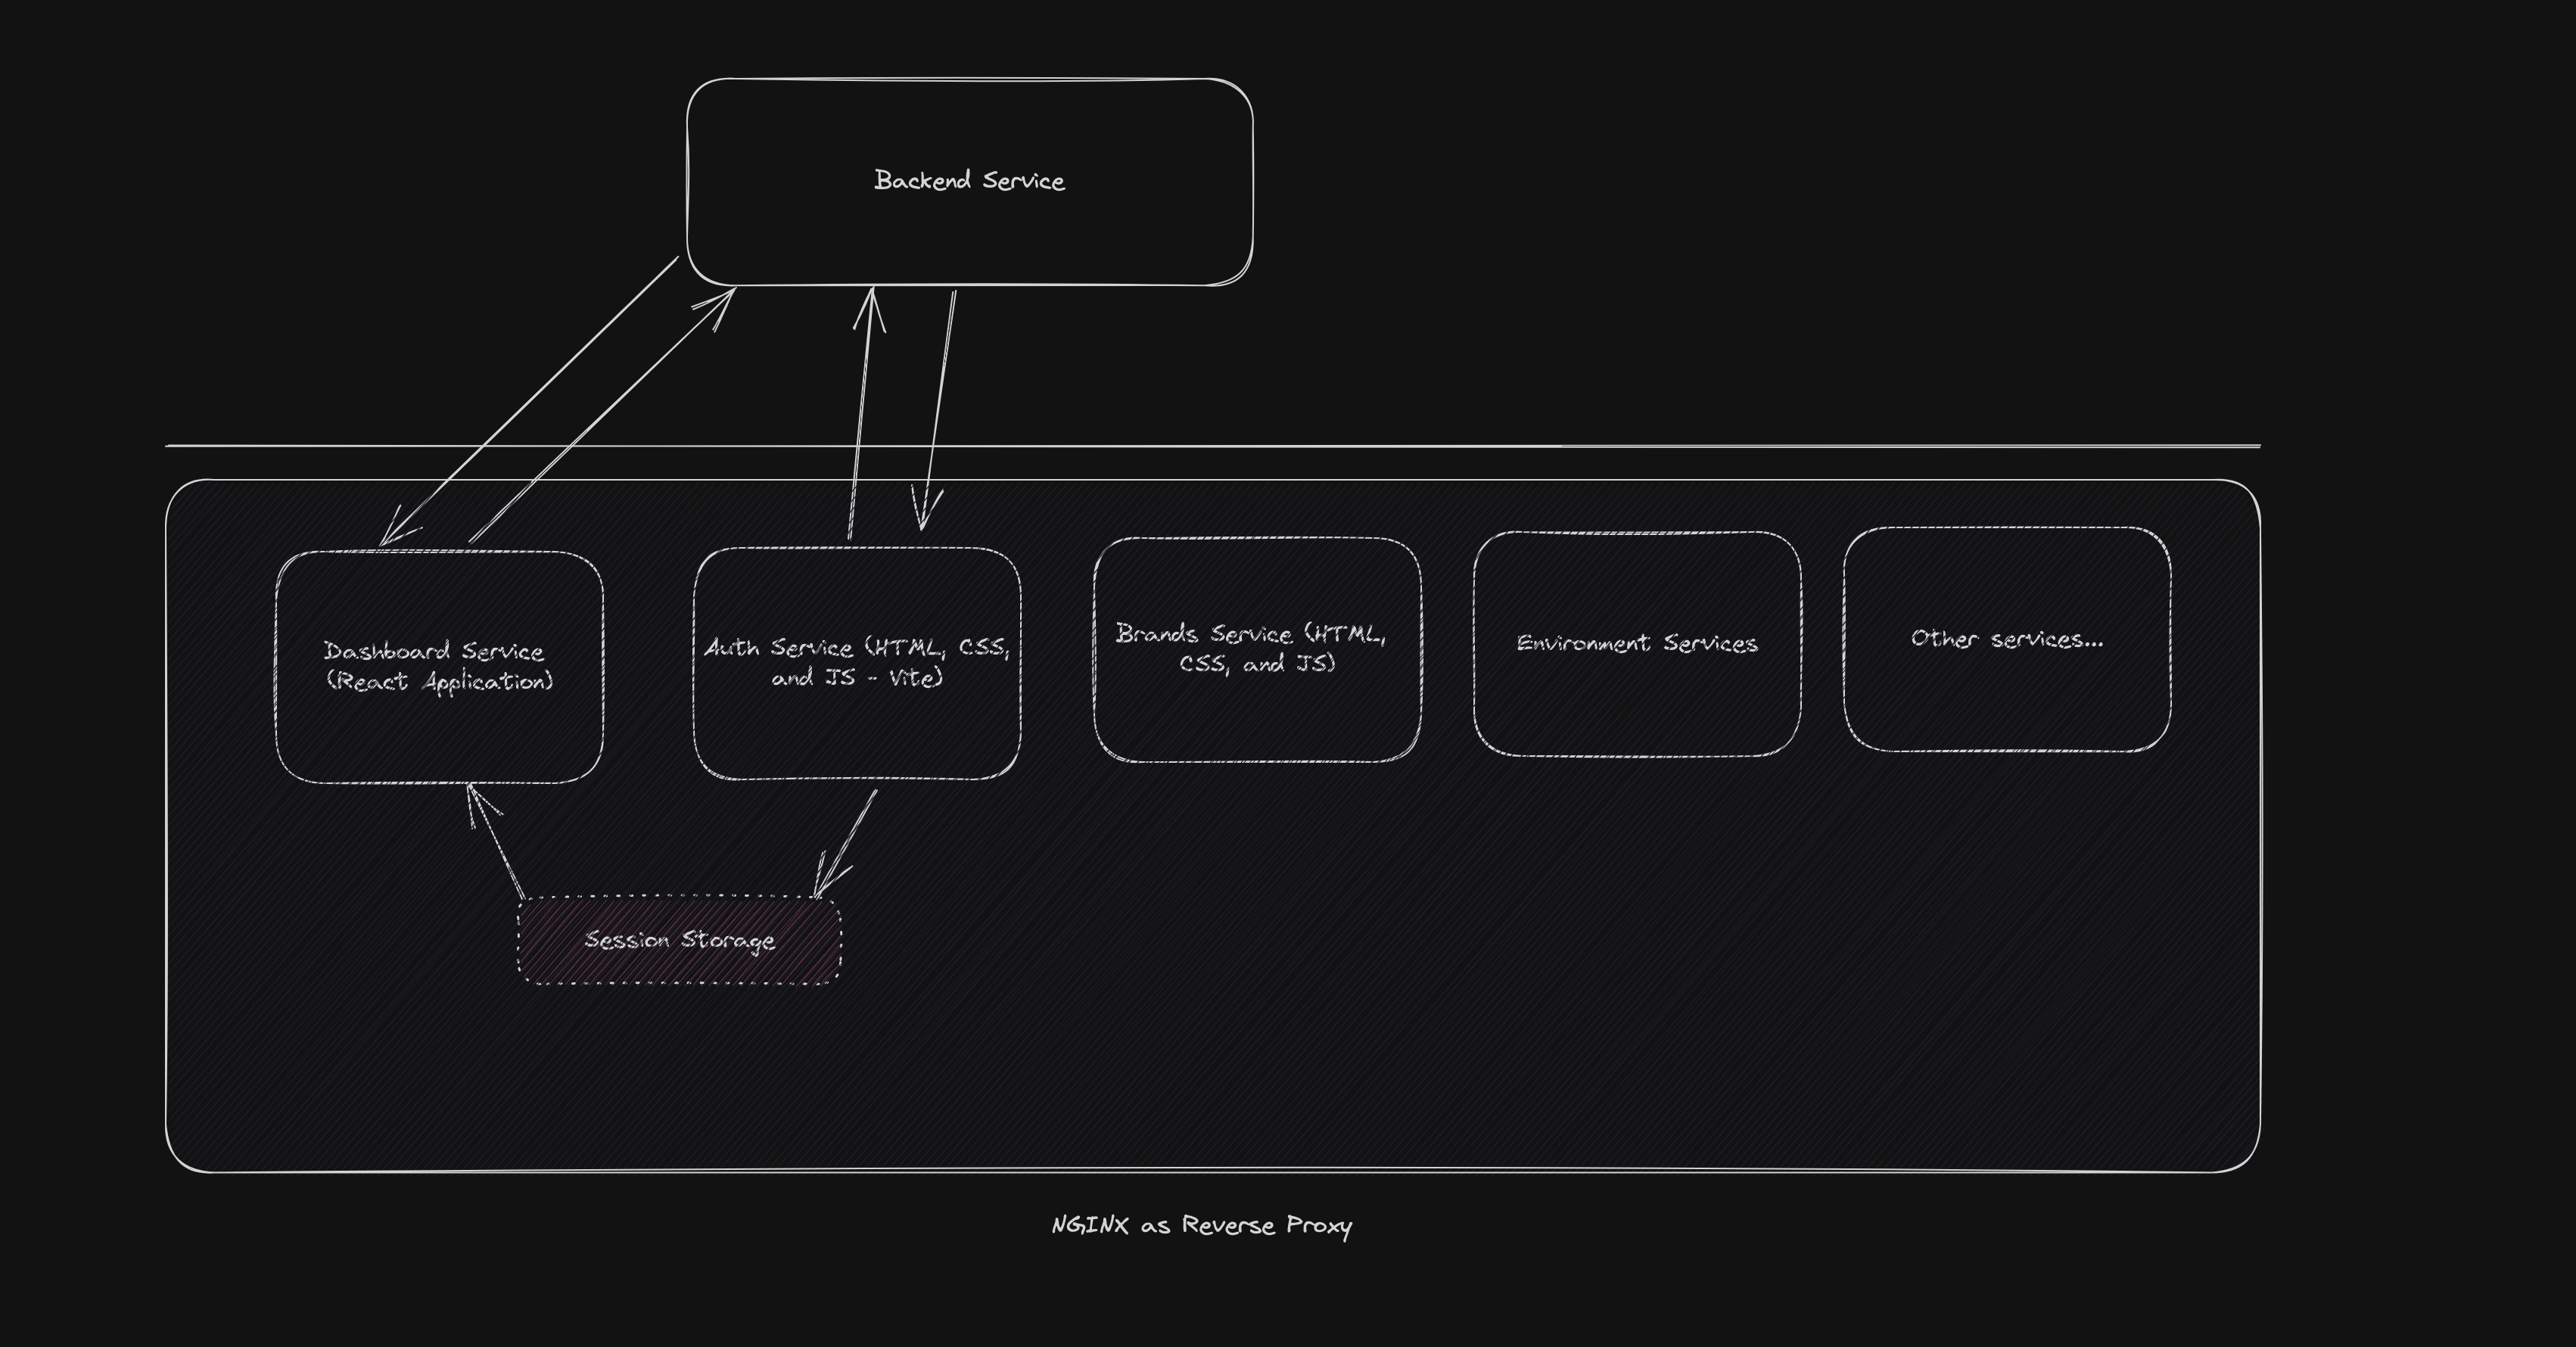
With NGINX, now we can serve multiple services under the same URL and port. Basically, you can achieve it with something like below:
    server {
        listen 8082;
        location /dashboard/auth {
            alias /var/www/auth/;
            index index.html;
        }

        ........ OTHER SERVICES ........

        location ^~ /dashboard {
            alias /var/www/dashboard/;
            index index.html index.htm;

            try_files $uri $uri/ /dashboard/index.html;
        }

    }
We can use NGINX as standard software or you can run the docker container for NGINX so that you can run as many NGINX servers as you want in your working machine.
This is going to solve the problem if you have already built the project as you are serving files rather than URLs in the NGINX configuration. Now we would like to run all of our applications inside a docker container like everyone else like to do. Why? There are tons of other advantages of docker but in our case, we like to integrate multiple services with nginx and reverse proxy on development.
Introducing Docker
Here is the simple Dockerfile that pulls the code and runs the application inside it.
# NodeJS Version 18
FROM node:18-buster-slim

# Copy everything to Dir
# Create .dockerignore before this
COPY . ./app

# Work to Dir
WORKDIR /app

# Install Node Packages
RUN yarn
RUN cd auth-service && yarn

# Set Env
ENV NODE_ENV development

# Expose PORTS
EXPOSE 3010
EXPOSE 3011

# Cmd script
CMD ["yarn", "start:dev"]
Looks simple right? Okay, what does start:dev do? Runs the different services that need to be built.
"start:dev": "concurrently \"vite --host=0.0.0.0 --port=3010\" \"cd auth-service && vite --host=0.0.0.0 --port=3011\"",
Please consider creating .dockerignore file before running Dockerfile.
# code formatter
.eslintrc
.eslintignore
.editorconfig
.huskyrc
.lintstagedrc.json
.prettierrc

# test
jest.config.js

# docker
Dockerfile
docker-compose.yml

# Build files
dist
authentication/dist


# Editor
.vscode
.idea

# Node modules
node_modules
auth-service/node_modules
env-service/node_modules
....other node_modules ...
Let's create docker-compose.yml file to run the docker container in a declarative way. Here is what our sample docker-compose file looks like.
version: '3.9'

services:
  proxy: # Service Name
    container_name: demo_proxy_server
    depends_on:
      - server
    image: nginx:alpine
    ports:
      - '8005:80' # Port to run NGINX server
    volumes:
      - ./nginx/nginx.local.conf:/etc/nginx/nginx.conf #sync nginx configuration file
    restart: 'unless-stopped'
    networks:
      - backend

  server: # Service Name
    container_name: demo_application_server
    build:
      context: ./
      dockerfile: Dockerfile.dev # Name of the docker file
    ports:
      - '3010:3010' # Port exposes as we are running in start:dev command
      - '3011:3011' # Expose other ports if needed
    volumes:
      - ./:/app # sync with host
      - /app/node_modules
      - /app/auth-serivce/node_modules
    restart: 'unless-stopped'
    networks:
      - backend

networks:
  backend:
    driver: bridge

volumes:
  data:
    driver: local
We are not going to describe the docker-compose file here but, commented on the important ones in the snippet above.
Let's look at the NGINX configuration file as well:
worker_processes auto;

events {
    worker_connections 8000;
    multi_accept on;
}


http{
    include       /etc/nginx/mime.types;
    default_type  application/octet-stream;

    upstream main {
        server server:3010; # <Service Name>:3010
    }

    upstream auth {
        server server:3011; # <Service Name>:3011
    }

    # .. others

    server {
        listen 80;
        server_name localhost;
        add_header Access-Control-Allow-Origin *;

        location /dashboard {
          proxy_pass http://main; # From upstream
        }

        location /dashboard/auth{
          proxy_pass http://auth; # From upstream
        }
    }

    log_format compression '$remote_addr - $remote_user [$time_local] '
        '"$request" $status $upstream_addr '
        '"$http_referer" "$http_user_agent"';
}
And that's it. Now you can run docker-compose up command to run multiple applications in docker and with NGINX.
Now you can access multiple applications as
http://localhost:8005/dashboard # Dashboard application
http://localhost:8005/dashboard/auth # Auth application
# ..... other applications in the same way --
I hope this article is helpful for you.
Keep Coding 👨🏼💻👨🏼💻👨🏼💻
Thank you 🙏🙏


![Learning Python as Javascript Developer [Part 1]](/_next/image?url=https%3A%2F%2Fcdn.hashnode.com%2Fres%2Fhashnode%2Fimage%2Funsplash%2FD9Zow2REm8U%2Fupload%2Fv1646936900783%2FTEfcNsOMP.jpeg&w=3840&q=75)